 Ubuntu Phone documentation
Platform guides - running autopilot tests
Autopilot is a common tool of choice for writing acceptance tests for applications developed with the Ubuntu SDK. This guide will cover the different options available to you for running the autopilot test suite for your applications. While the autopilot binary is also a testrunner, there are some other tools to make it easier to run on the desktop and the device. This guide assumes you are familiar with using autopilot testrunner.
Running tests on the desktop
Using the Ubuntu SDK
By utilizing the ubuntu SDK for development, it's easy to also run a project's autopilot tests directly from inside the SDK. Be sure to follow the installation guide for the SDK to ensure the SDK release ppa is installed. Then install the autopilot plugin package.
$ sudo apt-get update && sudo apt-get install qtcreator-plugin-autopilot
Once installed, launch the SDK and open a project. Click the Projects Tab, and Select Run to change the Run settings. Use the dropdown to select the 'Autopilot' run configuration. It will display a list of autopilot tests for the project.
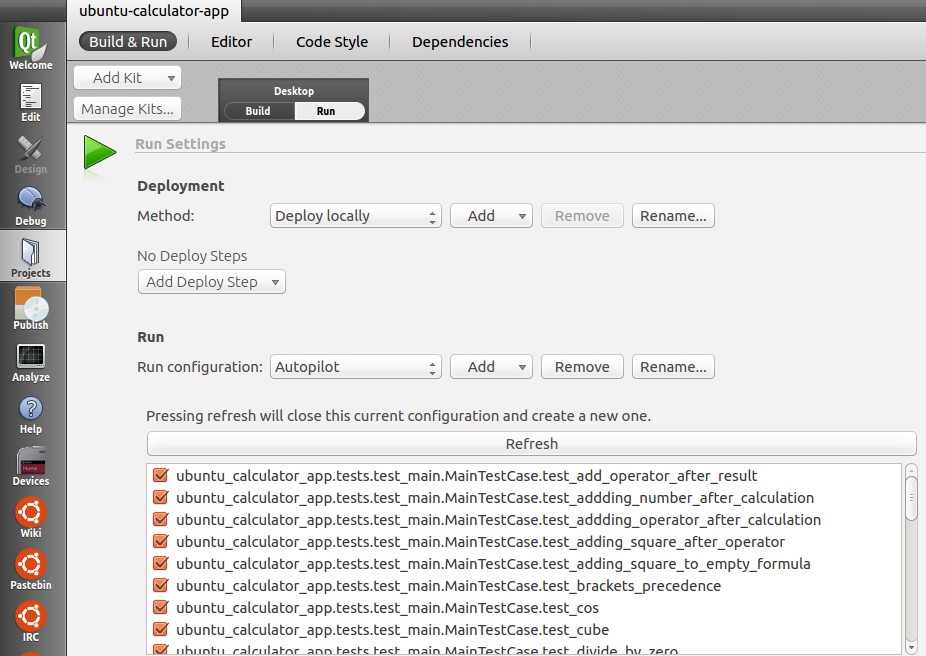
Choose a specific test to run or run them all. When ready, launch the tests as normal by pressing the run button. Your autopilot tests will now run inside a separate window. You can watch there execution or continue working. The results of the tests will be displayed in the Application Output Console.
autopilot3-sandbox-run
This tool ships with autopilot itself and was developed as a way to run
autopilot test suites on your desktop in a sane manner. If you have autopilot,
it's already installed. If not, make sure you install autopilotfirst. By default, autopilot will take control of your mouse and
keyboard for the test duration. This is not desirable in a desktop
environment. autopilot3-sandbox-run allows you to run autopilot tests in a
nested xserver, thereby retaining control of your mouse and keyboard on the
desktop.
Run the autopilot3-sandbox-run command with --help to see all the options
available. By default, the tests will run in an Xvfb server, all completely
behind the scenes with the results being reported to you upon completion. This
is a great way to run tests with no interference on your desktop. However, if
you are a visual person like me, you may instead wish to pass -X to enable the
test runs to occur in a Xephyr window allowing you to see what's happening,
but still retaining control of your mouse and keyboard.
Run tests without any UI
autopilot3-sandbox-run my_testsuite_name
I still want to see what's happening!
autopilot3-sandbox-run -X my_testsuite_name
Running tests on a phone
autopkgtest
Autopkgtest is the easiest way to run your tests on device, especially considering the device has a read-only image by default. Autopkgtest is available in the archives, but running on the phone requires autopkgtest 3.8.1 or newer. This requires vivid or newer. Please update you installation of autopkgtest before testing. The best way to ensure success is to download the latest deb and install it. The deb will cleanly install on Ubuntu 12.04 LTS and newer. The included documentation shows how to run tests for a lot of possible scenarios, but for touch specific tests these are the most common use cases:
Note: Your device likely has a password. You should pass it via the -p parameter**. So, to run tests of an already installed click package:
adt-run --click com.ubuntu.calculator --- ssh -s adb -- -p 0000
If you are working on your application and wish to run tests from a local
source directory be sure to pass the directory as the first argument. Finally,
you can also alternatively specify a path to a local click package to test
against, instead of a package name. For example, this will run the tests
inside my-source-code after installing my-click.click.
adt-run my-source-code/ my-click.click --- ssh -s adb -- -p 0000
Should you happen to have more than once device connected, don't forget to pass the serial along with the -s command.
adt-run my-source-code/ my-click.click --- ssh -s adb -- -s 12345 -p 0000
Caveats
If you test an older image, downloading the test dependencies sometimes fails
with "404 Not found". This is due to adt depending on the archive being in
sync with the packages present on the device. If the image is very old, the
packages and test dependencies at image build time are no longer available in
the archive. To work around this, you can prepend setup-commands ro-apt-update
to your to command line arguments.
adt-run --setup-commands ro-apt-update --click com.ubuntu.calculator --- ssh -s adb -- -p 0000
This will temporarily switch the device to r/w for running apt-get update, and then switch back to a read only image. This may allow the testing to proceed; and you need only run apt-get update one time. If you continue to get errors during test setup after trying this workaround, there is nothing you can do. Instead, flash a more current image in order to test.